When circumstances change your plans
An online experience designed for when you must suspend normal class times.
Create a group for your class!
We created a “blank” shell with nothing in it. You can build out your own service experience from a blank slate.
Interactive class at home
Is your school planning to suspend classes for a week or more? Because of the experience of Multipliciter with online experiences, it already has tools available to assist your class to empower your students to learn at home. This “Class at Home” option enables you to be:
- ENGAGING – Keep track of who is actually engaging in class and respond to their comments and questions.
- CONTENT – Help your students dive into the content and discuss it with you or other students.
- INTERACTIVE – Provide interactivity so they are not merely passively listening to something on the internet.
- CUSTOMIZED – Design the experience for your students. This could even include lectures you upload. Go to the page and click “Take with your own group.” It will automatically create a group and set you to the “Teacher” role which allows you to add/delete steps. Check out the “How to edit your path” lesson on our Teacher guide to learn more about this feature.
The beauty of a system like this is it can help you stay personally connected in a more holistic way while your students are not meeting in class for a season.
You can quickly engage in this opportunity by registering above.
FAQs
Does this cost?
No, it’s a free resource provided by Multipliciter. This resource leverages Multipliciter’s experience doing online learning.
Can I create my own group?
Yes! Be sure to choose the “Take with Your Own Group” option.
How do I invite my students?
1. Send invitations by email
- First, view the Path you’d like to invite people to in “Teach” mode.
- Now, select the “Invite” button from the top of the Path.
- Enter the email address of each person you wish to invite. To invite many people at once, just add multiple emails with commas in between them. Invite up to 50 people at a time this way.
- Choose the role you’d like the people you’re inviting to have (defaults to learner).
- Optionally, add a personal message (recommended). Now, just hit the “Send Invites” button. Your people will receive their invitation in their inbox in moments.
2. Share a private invitation link
If you’re looking to invite people to join from your intranet, a Slack channel, or some other communication, using a private invite link is a helpful option. To get a private link:
- Select the “Invite” button from the top of the Path.
- Select “get a shareable link.”
- Choose the role you want to use (defaults to learner).
- Use the “Copy link” button to copy the link into your computer’s clipboard.
- Now simply paste the link anywhere you’d like to use it.
The recipient will be prompted to create a new account (or sign in with an existing account) and then be enrolled in the course.
How do I remove someone from my group?
Use the “Remove from group” option under additional actions to remove a learner from a group. Once an individual is removed, he cannot be restored or re-enrolled in that group in any role. Contact support if you need help restoring or re-enrolling an individual who has been removed from a group.
How do I customize the experience?
You can customize this experience for your class. For example, you might want to add your own videos, create “submit” blocks, or add additional steps to this experience. Click “Take with your own group.” It will automatically create a group and set you to the “Teacher” role which allows you to add/delete steps. Check out the “How to edit your path” lesson on our Teacher guide to learn more about this feature.
What kind of content can I create?
32+ Blocks types…
- Three formats for Text: Paragraph, Two-column, and Markdown.
- Five layouts for single Images: Centered, Full width, Image with text, Image with annotations, Text on image.
- Three additional Gallery options for multiple images: Carousel, Two-column, and Three-column.
- Two layouts for Quotes: Quote and Quote with image.
- Six Media options: Video centered, Video full width, Attachments, Audio, Embed, Embed full-width.
- Four Interactive Blocks: Accordion, Tabs, Flashcards, and Tasklist.
- Five Assessment Blocks: Paragraph, Multiple-choice, Checkboxes, Annotated Assessment, and Submit Files.
- Two Title Blocks for headlining a step: Large title and Title with image.
- Three Dividers for neat divisions between Blocks: Horizontal rule, Dots, Spacer.
This is great but how do users turn off email notifications for my online experience?

You can manage due date notifications and discussion notifications under your Learn tab by clicking the down arrow icon and then toggling notifications on or off.
Can I turn on a daily or weekly notification digest?
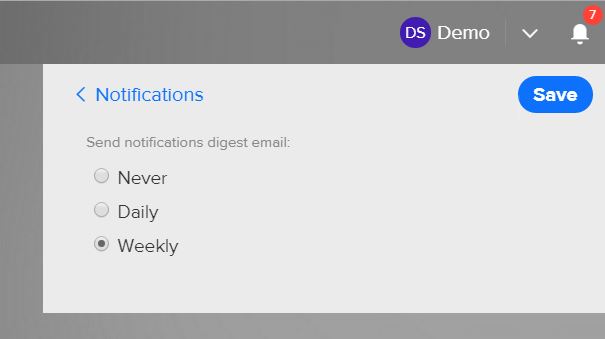
To subscribe to weekly or daily notification digest emails, sign into your account and click on the gear icon under the notification bell. From here you can select to receive the email digest Daily or Weekly (defaults to Never).
To unsubscribe from the email digest, click on the gear icon under your notification bell and select “Never.”
Can I subscribe just to individual discussions?
In some cases, you may want to subscribe to an individual discussion in order to get every response to that discussion, and not just direct responses to your own posts. To subscribe to a discussion, select the “Subscribe” button.

To unsubscribe and stop receiving all notifications, select the “Unsubscribe” button.

You can follow any notification straight to the original discussion by clicking on it. Once the discussion opens, use the unsubscribe button to stop receiving further notifications.
